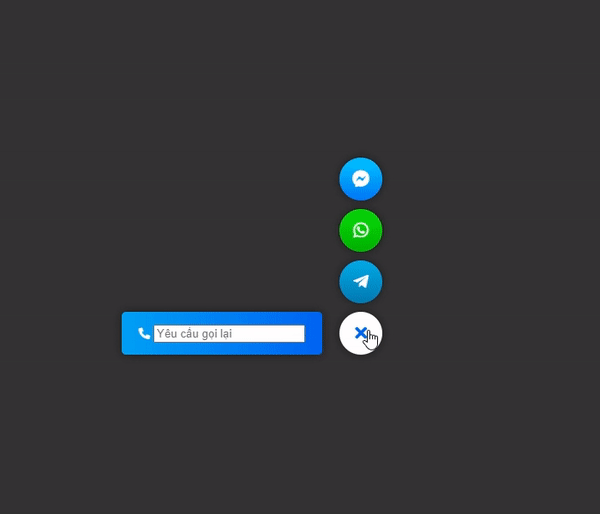
Được nhiều anh em hưởng ứng quá, cho nên mình quyết định sẽ chia sẻ cho anh em cách để thêm 1 bộ liên hệ all in one kèm theo 1 nút yêu cầu gọi lại. Anh em xem mẫu dưới này để biết thêm chi tiết nhé.
Một số lưu ý trước khi làm theo:
- Các bạn cài giúp mình plugin contact form 7, vì mình sử dụng plugin này để nhận dữ liệu đổ về.
- Font trong demo mình dùng là FontAwsome 5.9 vì vậy các bạn nên import font này vào trước nhé.
- Các bạn copy và dán code vào vị trí mà mình mong muốn, có 2 cách 1 là dùng hook để hook vào footer, 2 là các bạn copy và dán vào footer.
Bạn nào chưa biết cách chèn font awsome thì làm theo code này (Cách này không khuyến khích, theo mình nên tải bộ font về, nhưng cách này nhanh^^)
function add_font3(){
    echo '<link rel="stylesheet" href="https://cdnjs.cloudflare.com/ajax/libs/font-awesome/5.9.0/css/all.min.css" />';
}
add_action('wp_head','add_font3');
Đối với button này nó sẽ khác với button liên hệ all in one mà mình chia sẻ trước đây. Nó sẽ chia làm 3 phần HTML, CSS và JS các bạn pass nó vào các mục tương ứng nhé.
Bài viết mình sẽ chia làm 2 phần, 1 là sử dụng cho Flatsome ( Theme yêu thích của mình ), 2 là sử dụng ở tất cả mọi theme.
Phần HTML của button all in one phiên bản yêu cầu gọi lại.
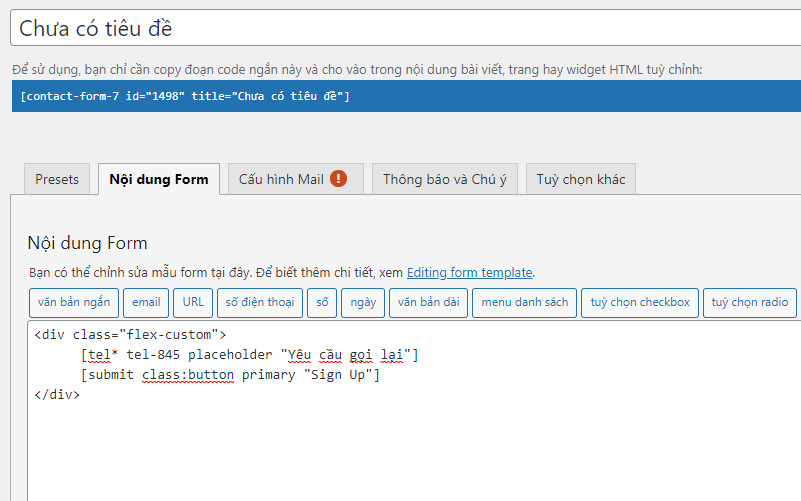
Đầu tiên các bạn tạo giúp mình 1 cái form contact form 7 với 1 input là số điện thoại và submit thôi nhé. Hoặc các bạn có thể copy đoạn này vào form của mình
<div class="flex-custom">
[tel* tel-521 class:sdt-pt placeholder "Yêu cầu gọi lại"]
      [submit class:button primary "Gửi"]
</div>
Sau đó đến phần HTML. Phần HTML này vì mình có sử dụng PHP nữa nên mình sẽ hook nó vào footer lun.
Lưu ý dòng số 6, bạn sửa lại bằng form của mình nhé.
function lh_all_in_one_pttuan(){;?>
  <div id="main-div">
      <div id="main-button" class="wave">
        <i class="fas fa-comments"></i>
      </div>
      <div class="btn-call"><i class="fas fa-phone-alt"></i><?php echo do_shortcode('[contact-form-7 id="231" title="Call"]');?></div>
      <a href="#" class="whatsapp-custom"><i class="fab fa-whatsapp"></i></a>
      <a href="#" class="messenger-custom"><i class="fab fa-facebook-messenger"></i></a>
      <a href="#" class="zalo-custom"><i class="zalo-pt"></i></a>
   </div>
<?php };
add_action('wp_footer','lh_all_in_one_pttuan');
Phần CSS của button all in one phiên bản yêu cầu gọi lại.
Phần CSS này các bạn paste nó vào file style.css hoặc vị trí CSS theme của mình nhé.
.wpcf7-form-control.sdt-pt{
    width:150px;
}
.flex-custom{
    display:flex;
}
.zalo-pt{
    background: url(https://pttuan410.com/wp-content/uploads/2021/05/zalo.png) center center no-repeat;
    background-size: contain;
    border-radius: 100%;
    height:30px;
    width:30px;
}

#main-div {
  position: fixed;
  right: 20px;
  bottom: 100px;
  z-index:999;
}

#main-button {
  display: flex;
  align-items: center;
  justify-content: center;
  position: absolute;
  right: 0;
  bottom: 0;
  height: 70px;
  width: 70px;
  font-size: 30px;
  color: #fff;
  cursor: pointer;
  background-color: #0064f3;
  box-shadow: 0 0 10px 0 rgba(0,0,0,.5);
  border-radius: 50%;
  -webkit-border-radius: 50%;
  -moz-border-radius: 50%;
  -ms-border-radius: 50%;
  -o-border-radius: 50%;
}

#main-button ~ .btn-call {
    display: flex;
    padding: 10px;
  visibility: hidden;
  font-weight: 600;
  height: 55px;
  color: #fff;
  background: linear-gradient(90deg, #00a1f5, #0064f3);
  box-shadow: 0 0 10px 0 rgba(0,0,0,.5);
  border: 0;
  position: absolute;
  z-index: -1;
  right: 0;
  bottom: 0;
  opacity: 0;
  white-space: nowrap;
  cursor: pointer;
  transition: .2s all linear;
  -webkit-transition: .2s all linear;
  -moz-transition: .2s all linear;
  -ms-transition: .2s all linear;
  -o-transition: .2s all linear;
  border-radius: 5px;
  -webkit-border-radius: 5px;
  -moz-border-radius: 5px;
  -ms-border-radius: 5px;
  -o-border-radius: 5px;
}
.btn-call .fas{
    font-size: 22px;
    margin: auto 10px;
}
#main-button.open ~ .btn-call {
  visibility: visible;
  right: 85px;
  opacity: 1;
  transition: .4s all cubic-bezier(0, 0.01, 0, 1.27);
  -webkit-transition: .4s all cubic-bezier(0, 0.01, 0, 1.27);
  -moz-transition: .4s all cubic-bezier(0, 0.01, 0, 1.27);
  -ms-transition: .4s all cubic-bezier(0, 0.01, 0, 1.27);
  -o-transition: .4s all cubic-bezier(0, 0.01, 0, 1.27);
}

#main-button ~ a {
  display: flex;
  align-items: center;
  justify-content: center;
  cursor: pointer;
  position: absolute;
  right: 0;
  bottom: 0;
  z-index: -1;
  height: 60px;
  width: 60px;
  font-size: 30px;
  opacity: 0;
  text-decoration: none;
  color: #fff;
  background-color: #fff;
  box-shadow: 0 0 10px 0 rgba(0,0,0,.5);
  border-radius: 50%;
  -webkit-border-radius: 50%;
  -moz-border-radius: 50%;
  -ms-border-radius: 50%;
  -o-border-radius: 50%;
  transition: .2s all linear;
  -webkit-transition: .2s all linear;
  -moz-transition: .2s all linear;
  -ms-transition: .2s all linear;
  -o-transition: .2s all linear;
}

#main-button ~ .zalo-custom {
  background: linear-gradient(0deg, #017AB1, #01ABE6);
}

#main-button ~ .whatsapp-custom {
  background: linear-gradient(0deg, #00B100, #09db09);
}

#main-button ~ .messenger-custom {
  background: linear-gradient(0deg, #0078FF, #00C6FF);
}

#main-button.open ~ a {
  opacity: 1;
  transition: .4s all cubic-bezier(0, 0.01, 0, 1.27);
  -webkit-transition: .4s all cubic-bezier(0, 0.01, 0, 1.27);
  -moz-transition: .4s all cubic-bezier(0, 0.01, 0, 1.27);
  -ms-transition: .4s all cubic-bezier(0, 0.01, 0, 1.27);
  -o-transition: .4s all cubic-bezier(0, 0.01, 0, 1.27);
}
#main-button.open ~ a:nth-of-type(1) {
  bottom: 80px;
}
#main-button.open ~ a:nth-of-type(2) {
  bottom: 160px;
}
#main-button.open ~ a:nth-of-type(3) {
  bottom: 240px;
}

.wave {
  animation-name: wave;
  animation-duration: 1s;
  animation-timing-function: linear;
  animation-iteration-count: infinite;
}

@keyframes wave {
  0% {box-shadow: 0 0 0px 0px rgba(255, 255, 255, 0.5);}
  100% {box-shadow: 0 0 0px 10px rgba(255, 255, 255, 0);}
}

.open {
  animation-iteration-count: 1;
}
.wpcf7-response-output{
    position: absolute;
    top: -75px;
    right: -35px;
}
HTML và CSS đã xong, để trong mượt hơn, các bạn thêm phần JS này nhé.
Thêm JQUERY vào button all in one phiên bản yêu cầu gọi lại.
<script>
jQuery(document).ready(function ($) {
var mainDiv =  jQuery('#main-button');
mainDiv.on('click', function($){
  jQuery(this).find('i').toggleClass('fa-times');
  jQuery(this).toggleClass('open');
});
});
</script>
Như vậy là xong, chúc các bạn thành công.
Nguồn : https://pttuan410.com