Nội dung bài viết được mình tham khảo từ web thanhtrungit và đưa về blog GiuseArt với mục đích chia sẻ lại cho những ai cần.
Theo thanhtrungit.com, tác giả các đoạn code hữu ích dưới đây có lẽ là anh Hung Bun. Xin được cám ơn tác giả và xin phép chia sẻ lại kiến thức hữu ích này cho cộng đồng nha!
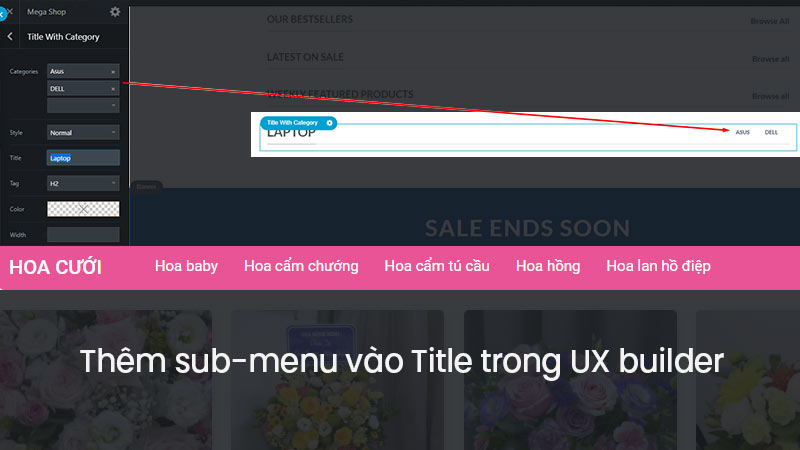
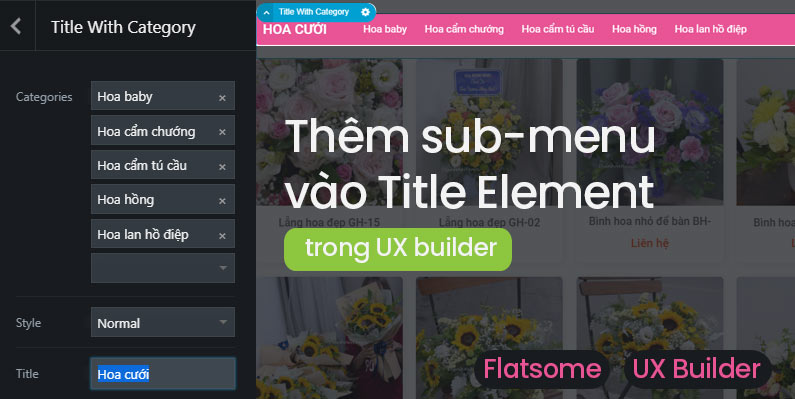
Phần việc chúng ta đang tìm hiểu các bạn có thể xem hình dưới đây:

Tạo element mới
Vì lý do một Element của Ux Builder không thể custom lại bằng cách viết vào child theme, bắt buộc chúng ta phải tạo 1 Element trong file functions.php của child theme.
Trong giao diện trang quản trị, bạn vào Giao diện – sửa – child-theme – functions.php và dán đoạn code sau vào cho mình:
function ttit_add_element_ux_builder(){
  add_ux_builder_shortcode('title_with_cat', array(
    'name'      => __('Title With Category'),
    'category'  => __('Content'),
    'info'      => '{{ text }}',
    'wrap'      => false,
    'options' => array(
      'ttit_cat_ids' => array(
        'type' => 'select',
        'heading' => 'Categories',
        'param_name' => 'ids',
        'config' => array(
          'multiple' => true,
          'placeholder' => 'Select...',
          'termSelect' => array(
            'post_type' => 'product_cat',
            'taxonomies' => 'product_cat'
          )
        )
      ),
      'style' => array(
        'type'    => 'select',
        'heading' => 'Style',
        'default' => 'normal',
        'options' => array(
          'normal'      => 'Normal',
          'center'      => 'Center',
          'bold'        => 'Left Bold',
          'bold-center' => 'Center Bold',
        ),
      ),
      'text' => array(
        'type'       => 'textfield',
        'heading'    => 'Title',
        'default'    => 'Lorem ipsum dolor sit amet...',
        'auto_focus' => true,
      ),
      'tag_name' => array(
        'type'    => 'select',
        'heading' => 'Tag',
        'default' => 'h3',
        'options' => array(
          'h1' => 'H1',
          'h2' => 'H2',
          'h3' => 'H3',
          'h4' => 'H4',
        ),
      ),
      'color' => array(
        'type'     => 'colorpicker',
        'heading'  => __( 'Color' ),
        'alpha'    => true,
        'format'   => 'rgb',
        'position' => 'bottom right',
      ),
      'width' => array(
        'type'    => 'scrubfield',
        'heading' => __( 'Width' ),
        'default' => '',
        'min'     => 0,
        'max'     => 1200,
        'step'    => 5,
      ),
      'margin_top' => array(
        'type'        => 'scrubfield',
        'heading'     => __( 'Margin Top' ),
        'default'     => '',
        'placeholder' => __( '0px' ),
        'min'         => - 100,
        'max'         => 300,
        'step'        => 1,
      ),
      'margin_bottom' => array(
        'type'        => 'scrubfield',
        'heading'     => __( 'Margin Bottom' ),
        'default'     => '',
        'placeholder' => __( '0px' ),
        'min'         => - 100,
        'max'         => 300,
        'step'        => 1,
      ),
      'size' => array(
        'type'    => 'slider',
        'heading' => __( 'Size' ),
        'default' => 100,
        'unit'    => '%',
        'min'     => 20,
        'max'     => 300,
        'step'    => 1,
      ),
      'link_text' => array(
        'type'    => 'textfield',
        'heading' => 'Link Text',
        'default' => '',
      ),
      'link' => array(
        'type'    => 'textfield',
        'heading' => 'Link',
        'default' => '',
      ),
    ),
  ));
}
add_action('ux_builder_setup', 'ttit_add_element_ux_builder');
Sau khi thêm vào function.php thành công, các bạn lưu lại file nha!
Hiển thị Title with Category vào UX builder
Đoạn code dưới đây sẽ giúp thêm một Element với tên “Title with Category” vào trong UX builder, khi các bạn chỉnh sửa trang bằng UX builder có thể dùng được Element này.
Trong trang quản trị, các bạn ấn Giao diện – sửa – child-theme – functions.php và paste đoạn code sau vào:
function title_with_cat_shortcode( $atts, $content = null ){
  extract( shortcode_atts( array(
    '_id' => 'title-'.rand(),
    'class' => '',
    'visibility' => '',
    'text' => 'Lorem ipsum dolor sit amet...',
    'tag_name' => 'h3',
    'sub_text' => '',
    'style' => 'normal',
    'size' => '100',
    'link' => '',
    'link_text' => '',
    'target' => '',
    'margin_top' => '',
    'margin_bottom' => '',
    'letter_case' => '',
    'color' => '',
    'width' => '',
    'icon' => '',
  ), $atts ) );
  $classes = array('container', 'section-title-container');
  if ( $class ) $classes[] = $class;
  if ( $visibility ) $classes[] = $visibility;
  $classes = implode(' ', $classes);
  $link_output = '';
  if($link) $link_output = '<a href="'.$link.'" target="'.$target.'">'.$link_text.get_flatsome_icon('icon-angle-right').'</a>';
  $small_text = '';
  if($sub_text) $small_text = '<small class="sub-title">'.$atts['sub_text'].'</small>';
  if($icon) $icon = get_flatsome_icon($icon);
  // fix old
  if($style == 'bold_center') $style = 'bold-center';
  $css_args = array(
   array( 'attribute' => 'margin-top', 'value' => $margin_top),
   array( 'attribute' => 'margin-bottom', 'value' => $margin_bottom),
  );
  if($width) {
    $css_args[] = array( 'attribute' => 'max-width', 'value' => $width);
  }
  $css_args_title = array();
  if($size !== '100'){
    $css_args_title[] = array( 'attribute' => 'font-size', 'value' => $size, 'unit' => '%');
  }
  if($color){
    $css_args_title[] = array( 'attribute' => 'color', 'value' => $color);
  }
  if ( isset( $atts[ 'ttit_cat_ids' ] ) ) {
    $ids = explode( ',', $atts[ 'ttit_cat_ids' ] );
    $ids = array_map( 'trim', $ids );
    $parent = '';
    $orderby = 'include';
  } else {
    $ids = array();
  }
  $args = array(
    'taxonomy' => 'product_cat',
    'include'    => $ids,
    'pad_counts' => true,
    'child_of'   => 0,
  );
  $product_categories = get_terms( $args );
  $hdevvn_html_show_cat = '';
  if ( $product_categories ) {
    foreach ( $product_categories as $category ) {
      $term_link = get_term_link( $category );
      $thumbnail_id = get_woocommerce_term_meta( $category->term_id, 'thumbnail_id', true  );
      if ( $thumbnail_id ) {
        $image = wp_get_attachment_image_src( $thumbnail_id, $thumbnail_size);
        $image = $image[0];
      } else {
        $image = wc_placeholder_img_src();
      }
      $hdevvn_html_show_cat .= '<li class="hdevvn_cats"><a href="'.$term_link.'">'.$category->name.'</a></li>';
    }
  }
  return '<div class="'.$classes.'" '.get_shortcode_inline_css($css_args).'><'. $tag_name . ' class="section-title section-title-'.$style.'"><b></b><span class="section-title-main" '.get_shortcode_inline_css($css_args_title).'>'.$icon.$text.$small_text.'</span>
  <span class="hdevvn-show-cats">'.$hdevvn_html_show_cat.'</span><b></b>'.$link_output.'</' . $tag_name .'></div><!-- .section-title -->';
}
add_shortcode('title_with_cat', 'title_with_cat_shortcode');
Hướng dẫn sử dụng
Các bạn muốn thêm Tiêu đề kèm các link danh mục thì vào phần sửa trang with Ux Builder, các bạn phải gõ chữ “title…” vào khung search thì nó mới hiện ra nhé, chứ kéo tìm các element bên dưới tìm mãi không thấy đâu.
Thêm hiệu ứng CSS trang trí
Đã hoàn thành việc thêm Element và có thể sử dụng, tuy nhiên, Tiêu đề có danh mục con hiển thị ra bên ngoài lúc này chưa được đẹp, việc còn lại của chúng ta là CSS lại cho nó đẹp hơn nhé!

Mình sẽ hướng dẫn các bạn CSS như mẫu ở trang demo này nha, còn lại thì các bạn tùy chỉnh cho phù hợp thế nào là việc riêng của các bạn tự làm nha!
Các bạn vào Giao diện – Tùy biến – Style – Custom CSS và paste toàn bộ đoạn code CSS này vào nha!
.section-title-normal {
    margin-bottom: 20px;
    border-bottom: 0;
    border-radius: 5px;
}
.section-title-normal {
    background: #e85495;
}.section-title-normal b {
    display: none;
}.section-title-normal span {
    margin-right: 15px;
    padding-bottom: 0;
    border-bottom: 0;
    margin-bottom: 0;
    font-size: 20px;
    color: white!important;
    padding: 10px;
}span.hdevvn-show-cats li {
    display: block;
    width: auto;
    float: left;
    margin: 0 8px;
}span.hdevvn-show-cats li a {
    font-size: 15px;
    text-transform: none;
    font-weight: 400;
    margin-right: 0!important;
    padding-left: 10px;
}.section-title a {
    font-size: 14px;
    margin-left: auto;
    color: white;
    margin-right: 10px;
}
Tiếp theo, các bạn vào tiếp mục Custom CSS Mobile và paste đoạn này vào (để ẩn các danh mục phụ trên mobile cho đỡ vướng):
.hdevvn-show-cats {
    display: none;
}
Lời kết
Thế là kết thúc tốt đẹp, các bạn hãy thử làm xem Ok không nha. Cám ơn tác giả của những đoạn code tùy biến trên, nó giúp ích khá tốt cho công việc của mình. Còn các bạn, chúc các bạn có những trải nghiệm thú vị khi ghé thăm website nhé!
Nguồn : https://giuseart.com