This is a comprehensive Laravel 8 JWT Authentication example tutorial. In this article, we will learn how to create secure REST APIs in Laravel using JSON Web Token (JWT). To protect user authentication API in Laravel 8|7 we will use tymondesigns/jwt-auth a third-party jwt-auth library.
Creating robust APIs in Laravel is secure, easy, and exciting. Laravel makes the development process relatively easy. It takes out almost entire pain for developing comprehensive functionalities commonly used for web development, like authentication, routing, sessions, and caching.
What is JSON Web Token?
JSON Web Token (JWT) is an open standard (RFC 7519), and it represents a compact and self-contained method for securely transmitting information between parties as a JSON object. Digital signature makes the data transmission via JWT trusted and verified. JWTs built upon the secret HMAC algorithm or a public/private key pair using RSA or ECDSA.
Why is JWT Required?
JWT is used for Authorization and information exchange between server and client. It authenticates the incoming request and provides an additional security layer to REST API, which is best for security purposes.
How does JWT Work?
User information such as username and password is sent to the web-server using HTTP GET and POST requests. The web server identifies the user information and generates a JWT token and sends it back to the client. Client store that token into the session and also set it to the header. On the next HTTP call, that token is verified by the server, which returns the response to the client.
JSON Web Token Structure
JSON Web Tokens contains three parts separated by dots (.) In its dense form.
- Header
- Payload
- Signature
Eventually, a JWT similarly looks like this.
xxxxxx.yyyyyyy.zzzzzzzzzz
Install Laravel Application
Enough for getting started, now we will begin to creating secure Laravel APIs. Let us install a brand new laravel project to formulate the Laravel 8 REST API project using JWT authentication.
Run following command to install a fresh Laravel project.
composer create-project laravel/laravel laravel-jwt-auth --prefer-dist
Database Connection
We have created a brand new Laravel application from scratch, now to store the user registration data, we have to create a database in MySQL and add the database name, user name, and password inside the .env file.
DB_CONNECTION=mysql
DB_HOST=127.0.0.1
DB_PORT=3306
DB_DATABASE=laravel
DB_USERNAME=root
DB_PASSWORD=
For handling laravel jwt custom authentication we are using MAMP, you might get the following migration error.
SQLSTATE[HY000] [2002] No such file or directory (SQL: select * from information_schema.tables where table_schema = laravel_db and table_name = migrations and table_type = ‘BASE TABLE’)
Add the single line of code below the database configuration in the .env file.
DB_HOST=localhost;unix_socket=/Applications/MAMP/tmp/mysql/mysql.sock
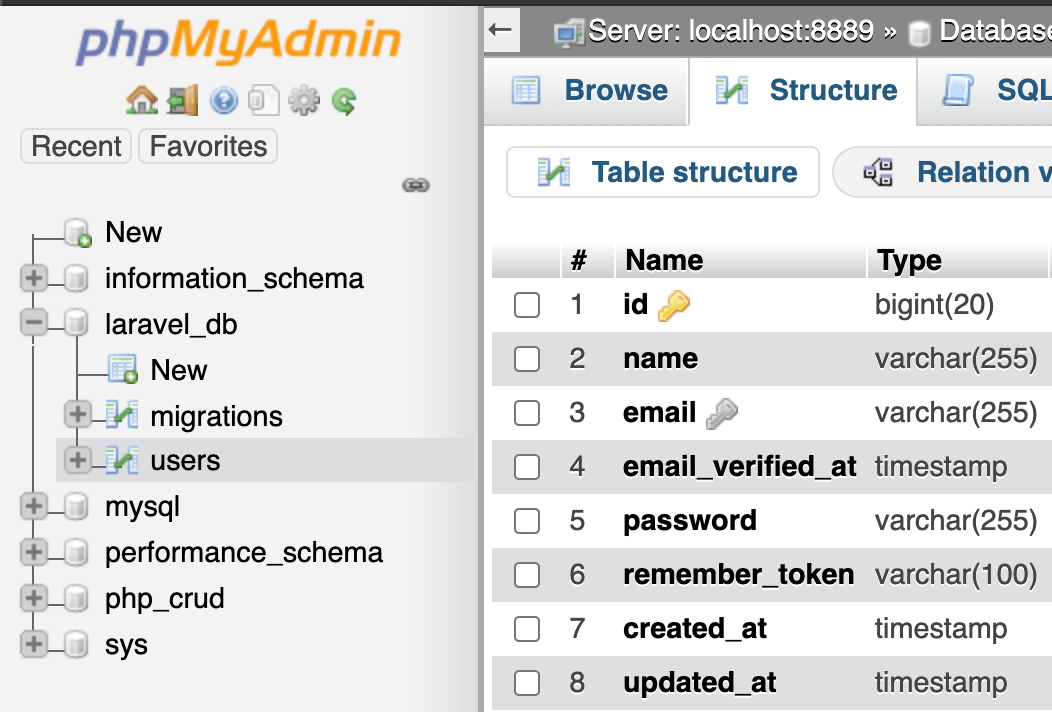
Add User into MySQL Database
In this step, we will learn how to register a user table in MySQL database. Laravel fresh installation offers a default user table that we can register into the database using migration.
php artisan migrate
The above command has created a users table inside the database.
Install & Configure JWT Authentication Package
Execute the following command to install tymondesigns/jwt-auth, It is a third-party JWT package and allows user authentication using JSON Web Token in Laravel & Lumen securely.
composer require tymon/jwt-auth
Above command installed the jwt-auth package in the vendor folder, now we have to go to config/app.php file and include the laravel service provider inside the providers array.
Also include the JWTAuth and JWTFactory facades inside the aliases array.
'providers' => [
    ....
    ....
    Tymon\JWTAuth\Providers\LaravelServiceProvider::class,
],
'aliases' => [
    ....
    'JWTAuth' => Tymon\JWTAuth\Facades\JWTAuth::class,
    'JWTFactory' => Tymon\JWTAuth\Facades\JWTFactory::class,
    ....
],
In the next step, we have to publish the package’s configuration, following command copy JWT Auth files from vendor folder to config/jwt.php file.
php artisan vendor:publish --provider="Tymon\JWTAuth\Providers\LaravelServiceProvider"
For handling the token encryption, generate a secret key by executing the following command.
php artisan jwt:secret
We have successfully generated the JWT Secret key, and you can check this key inside the .env file.
JWT_SECRET=secret_jwt_string_key
Set Up User Model
Laravel comes with a pre-defined User model; we can use the User model for authentication process. In this step, we will learn how to implement the jwt-auth package in a user model.
Define Tymon\JWTAuth\Contracts\JWTSubject contract before the User model. This method wants you to define the two methods:
getJWTIdentifier(): Get the identifier that will be stored in the subject claim of the JWT.getJWTCustomClaims(): Return a key value array, containing any custom claims to be added to the JWT.
Open the app/Models/User.php file and replace the following code with the existing code.
<?php

namespace App\Models;

use Illuminate\Contracts\Auth\MustVerifyEmail;
use Illuminate\Database\Eloquent\Factories\HasFactory;
use Illuminate\Foundation\Auth\User as Authenticatable;
use Illuminate\Notifications\Notifiable;

use Tymon\JWTAuth\Contracts\JWTSubject;


class User extends Authenticatable implements JWTSubject
{
    use HasFactory, Notifiable;

    /**
     * The attributes that are mass assignable.
     *
     * @var array
     */
    protected $fillable = [
        'name',
        'email',
        'password',
    ];

    /**
     * The attributes that should be hidden for arrays.
     *
     * @var array
     */
    protected $hidden = [
        'password',
        'remember_token',
    ];

    /**
     * The attributes that should be cast to native types.
     *
     * @var array
     */
    protected $casts = [
        'email_verified_at' => 'datetime',
    ];

    /**
     * Get the identifier that will be stored in the subject claim of the JWT.
     *
     * @return mixed
     */
    public function getJWTIdentifier() {
        return $this->getKey();
    }

    /**
     * Return a key value array, containing any custom claims to be added to the JWT.
     *
     * @return array
     */
    public function getJWTCustomClaims() {
        return [];
    }
}
Configure Auth guard
Now, we need to set up the JWT Auth Guard to secure the Laravel application’s authentication process. Laravel guard uses the session driver to protect the guards. However, we set the defaults guard to api, and the api guards is ordered to use jwt driver
Place the following code in config/auth.php file.
<?php

return [

    'defaults' => [
        'guard' => 'api',
        'passwords' => 'users',
    ],


    'guards' => [
        'web' => [
            'driver' => 'session',
            'provider' => 'users',
        ],

        'api' => [
            'driver' => 'jwt',
            'provider' => 'users',
            'hash' => false,
        ],
    ],
Build Authentication Controller
In this step, we will create the JWT authentication controller, and in this auth controller, we will define the core logic for secure authentication process in Laravel 8.
Let us define the auth controller manually or by using the below command to manage the authentication requests via routes that we created in the previous step.
php artisan make:controller AuthController
Place the following code inside the app/Http/Controllers/AuthController.php file.
<?php

namespace App\Http\Controllers;
use Illuminate\Http\Request;

use Illuminate\Support\Facades\Auth;
use App\Models\User;
use Validator;


class AuthController extends Controller
{
    /**
     * Create a new AuthController instance.
     *
     * @return void
     */
    public function __construct() {
        $this->middleware('auth:api', ['except' => ['login', 'register']]);
    }

    /**
     * Get a JWT via given credentials.
     *
     * @return \Illuminate\Http\JsonResponse
     */
    public function login(Request $request){
    	$validator = Validator::make($request->all(), [
            'email' => 'required|email',
            'password' => 'required|string|min:6',
        ]);

        if ($validator->fails()) {
            return response()->json($validator->errors(), 422);
        }

        if (! $token = auth()->attempt($validator->validated())) {
            return response()->json(['error' => 'Unauthorized'], 401);
        }

        return $this->createNewToken($token);
    }

    /**
     * Register a User.
     *
     * @return \Illuminate\Http\JsonResponse
     */
    public function register(Request $request) {
        $validator = Validator::make($request->all(), [
            'name' => 'required|string|between:2,100',
            'email' => 'required|string|email|max:100|unique:users',
            'password' => 'required|string|confirmed|min:6',
        ]);

        if($validator->fails()){
            return response()->json($validator->errors()->toJson(), 400);
        }

        $user = User::create(array_merge(
                    $validator->validated(),
                    ['password' => bcrypt($request->password)]
                ));

        return response()->json([
            'message' => 'User successfully registered',
            'user' => $user
        ], 201);
    }


    /**
     * Log the user out (Invalidate the token).
     *
     * @return \Illuminate\Http\JsonResponse
     */
    public function logout() {
        auth()->logout();

        return response()->json(['message' => 'User successfully signed out']);
    }

    /**
     * Refresh a token.
     *
     * @return \Illuminate\Http\JsonResponse
     */
    public function refresh() {
        return $this->createNewToken(auth()->refresh());
    }

    /**
     * Get the authenticated User.
     *
     * @return \Illuminate\Http\JsonResponse
     */
    public function userProfile() {
        return response()->json(auth()->user());
    }

    /**
     * Get the token array structure.
     *
     * @param  string $token
     *
     * @return \Illuminate\Http\JsonResponse
     */
    protected function createNewToken($token){
        return response()->json([
            'access_token' => $token,
            'token_type' => 'bearer',
            'expires_in' => auth()->factory()->getTTL() * 60,
            'user' => auth()->user()
        ]);
    }

}
The auth:api middleware is used within the constructor; functions inside the authentication controller can not be accessed without having the valid token. Also, we can pass the functions name inside the middleware that we want to exclude from the token obligation.
The login method is used to provide access to the user, and it is triggered when /api/auth/login API is called. It authenticates email and password entered by the user in an email and password field. In response, it generates an authorization token if it finds a user inside the database. Vice versa it displays an error if the user is not found in the database.
The register method is used to create a user when /api/auth/register route is called. First, user values such as name, email and password are validated through the validation process, and then the user is registered if the user credentials are valid. Then, it generates the JSON Web Token to provide valid access to the user.
The logout method is called when /api/auth/logout API is requested, and it clears the passed JWT access token.
The refresh method creates a new JSON Web Token in a shorter period, and It is considered a best practice to generate a new token for the secure user authentication system in Laravel 8|7. It invalidates the currently logged in user if the JWT token is not new.
The userProfile method renders the signed-in user’s data. It works when we place the auth token in the headers to authenticate the Auth request made through the /api/auth/user-profile API.
The createNewToken function creates the new JWT auth token after a specified period of time, we have defined token expiry and logged in user data in this function.
Add Authentication Routes
We need to define the REST API authentication routes for auth process in Laravel JWT Authentication application. The routes that are served through routes/api.php are prefixed with api/ and authentication routes are denoted by auth/.
So it becomes /api/auth/signup, and it goes same for every route we have created for authentication.
We need to add authentication routes in routes/api.php instead of web.php:
<?php

use Illuminate\Http\Request;
use Illuminate\Support\Facades\Route;
use App\Http\Controllers\AuthController;

/*
|--------------------------------------------------------------------------
| API Routes
|--------------------------------------------------------------------------
|
| Here is where you can register API routes for your application. These
| routes are loaded by the RouteServiceProvider within a group which
| is assigned the "api" middleware group. Enjoy building your API!
|
*/

Route::group([
    'middleware' => 'api',
    'prefix' => 'auth'

], function ($router) {
    Route::post('/login', [AuthController::class, 'login']);
    Route::post('/register', [AuthController::class, 'register']);
    Route::post('/logout', [AuthController::class, 'logout']);
    Route::post('/refresh', [AuthController::class, 'refresh']);
    Route::get('/user-profile', [AuthController::class, 'userProfile']);
});
Test Laravel JWT Authentication API with Postman
Start the laravel application with following command:
php artisan serve
We have created a secure REST API using JWT Authentication. To make the testing process easy and subtle, we will rely on Postman.
Authentication APIs for Login, Register, User Profile, Token Refresh and Logout.
| Method | Endpoint |
|---|---|
| POST | /api/auth/register |
| POST | /api/auth/login |
| GET | /api/auth/user-profile |
| POST | /api/auth/refresh |
| POST | /api/auth/logout |
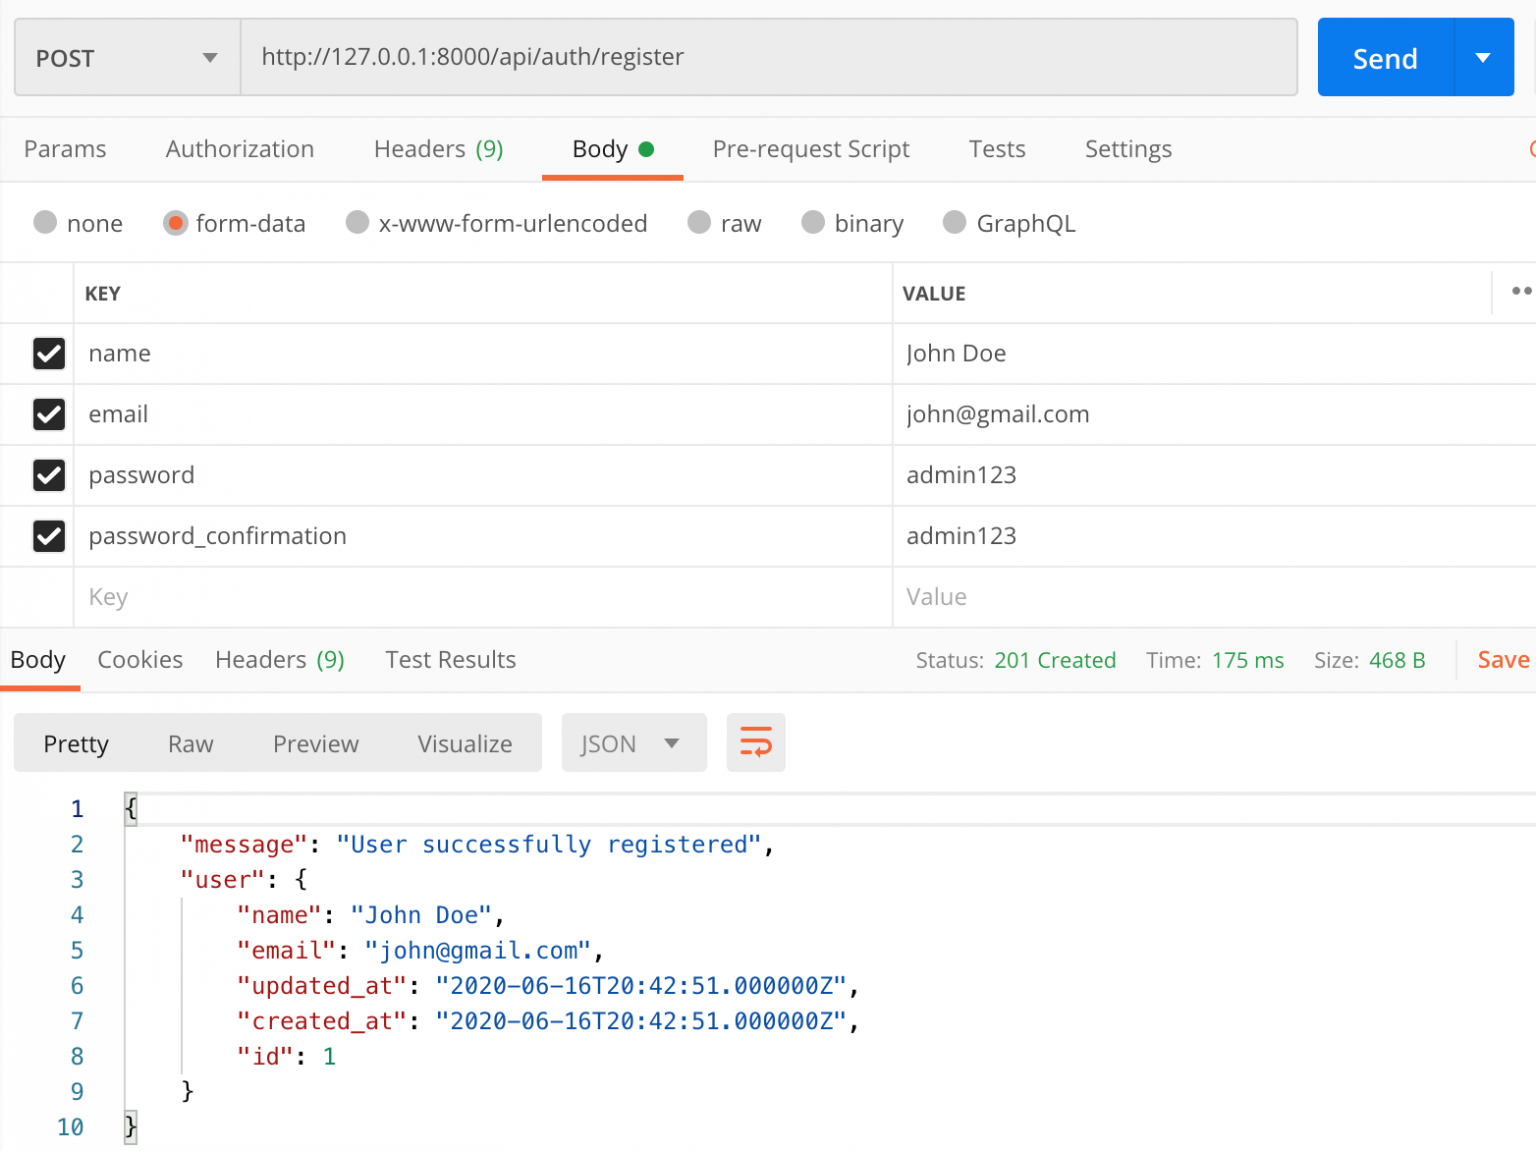
User Registration API in Laravel
Open the Postman, and add the user registration API in the address bar and select the HTTP request method to POST. Select the form-data and add the name, email, password, and password confirmation values in the input fields. Click on the Send button to see the response coming from the server.
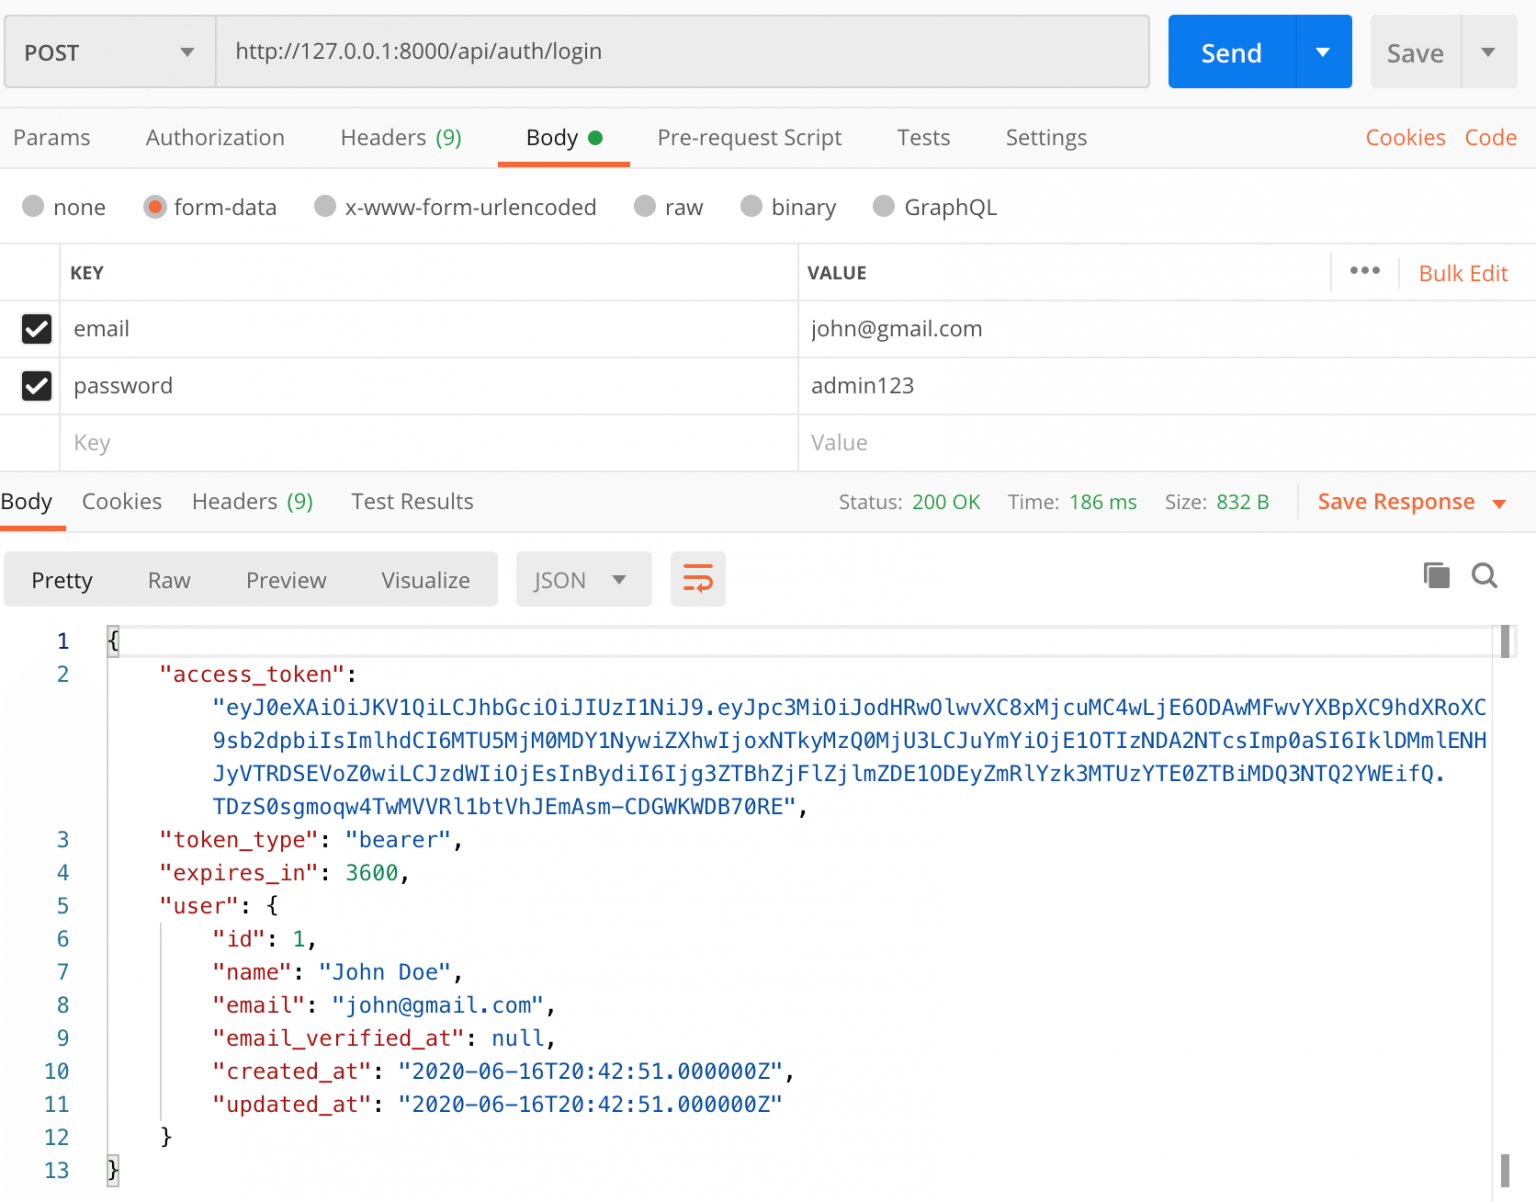
Test Laravel Login API
To test login API in Laravel with JWT Authentication token, add the email and password details in the input fields and click on the Send button. You can see on successful login a JWT access token, token type, token expiration time, and user profile details returned.
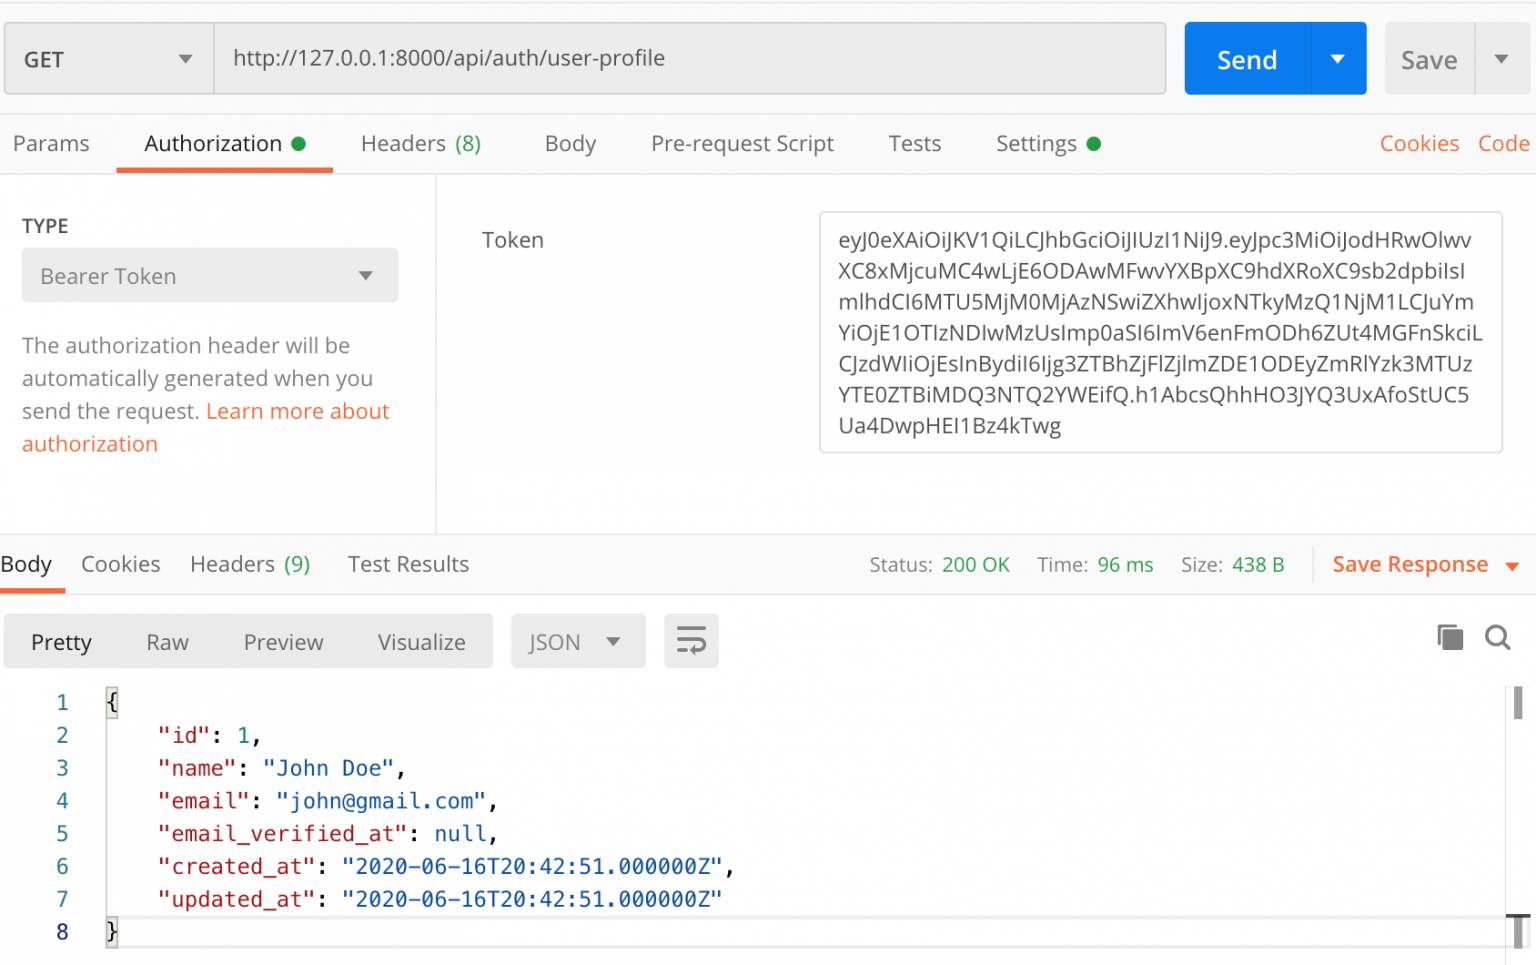
User Profile
Make sure you must define the access token as a header field "Authorization: Bearer Token" for User Profile, Token Refresh, and Logout REST APIs.
JWT Token Refresh in Laravel
To refresh a token We must have a valid JWT token, you can see we are getting the access_token and user data in Postman response block.
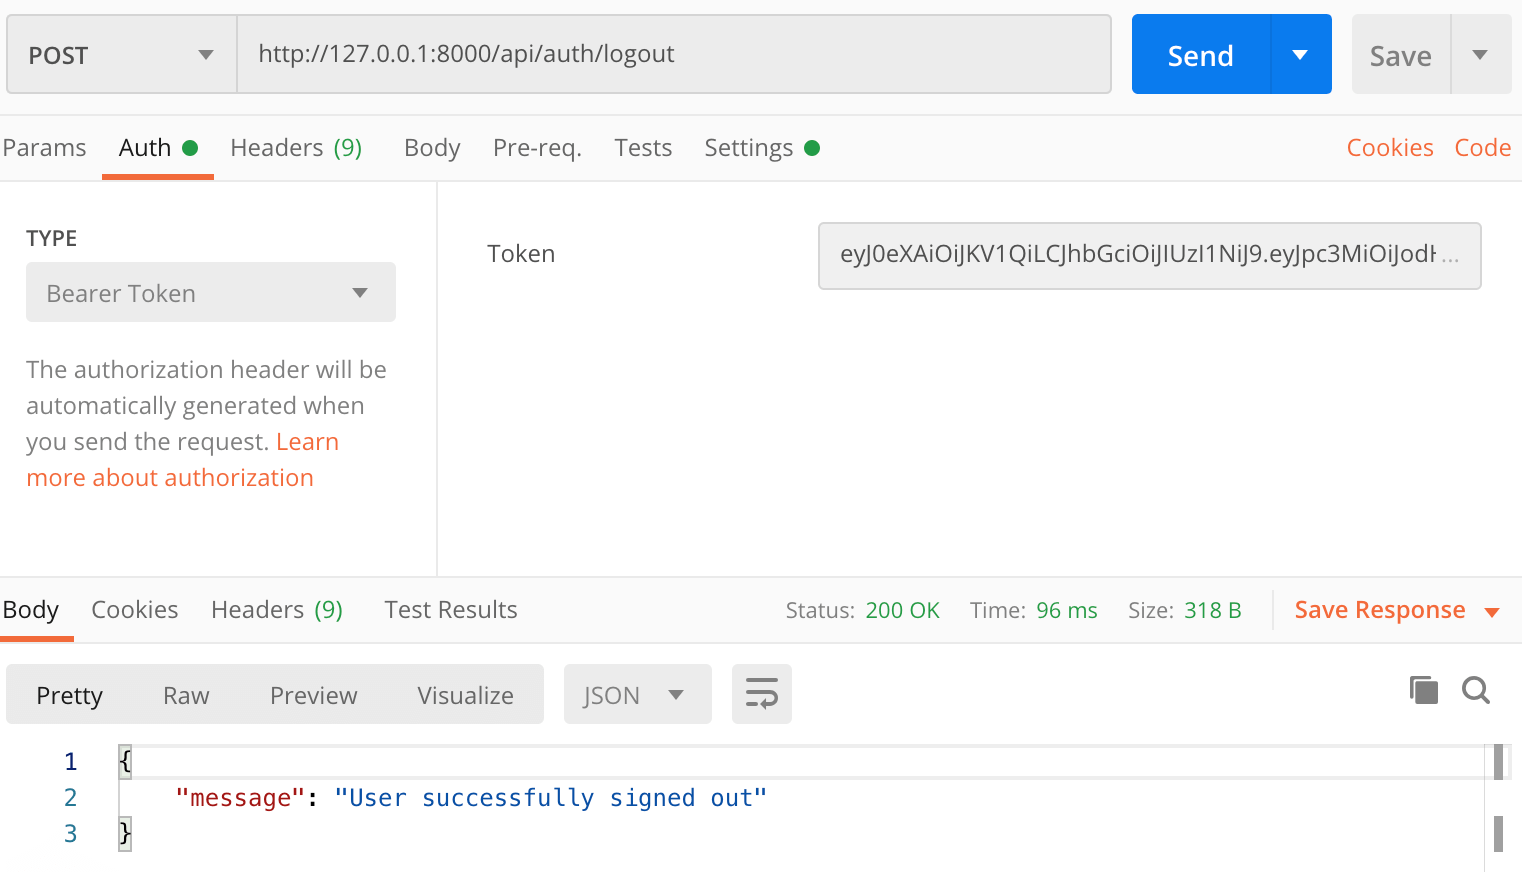
Logout
We destroyed the JWT token on logout and you can use Postman to test the Logout API as follows.
Conclusion
So this was it, in this article, we learned how to create secure user authentication REST API with JWT Authentication. You can get the full code of this project on GitHub.
By now, you have the basic understanding of building secure-auth APIs. You may also love to know how to build a CRUD Application in Laravel.
Nguồn : https://www.positronx.io